Building a Backyard Compost Pile
Step 1: Find a Location

A compost pile should be located in an area that is relatively level and has good drainage. It does not matter whether the pile is in sun or shade - compost piles are not solar-powered, they are decomposer-powered (the heat is generated within the pile)! As a general rule, try to find an area with about 2 cubic yards worth of space (the exact amount of space you need will vary depending on the type of bin you use). The active pile will take up about half that area, and you will use the other half for turning the pile.
The location should be easily accessible and close enough to your house that it is convenient to use, but not so close that it could attract critters into your house (avoid putting it right up against your house!). It also should not be located right next to your garden - animals that might rummage around in your compost (like squirrels or mice) are harmless in the pile, but can damage your garden. A few yards away from both your house and your garden should be fine.

Step 2: Choose a Container
The options for compost bins are in no short supply. If you prefer to purchase a ready-made system, options include tumblers, wooden boxes, wire cages, and plastic bins. When choosing a bin, consider ease of turning the pile and harvesting finished compost. Some containers are really difficult to maneuver - be sure to read reviews and ask around if you are not sure! It is also recommended to use a bin or container that is open on the bottom, so the soil underneath can inoculate your pile with microbes and decomposers.
There is an abundance of DIY options, too. You can make a bin out of pallets, chicken wire or mesh fencing, or a trash can.
You also can do without a container. You can bury food scraps in the ground with the trench composting method, or build an open pile.
Step 3: Source your Ingredients
There are two main components in compost: “greens” (materials that are rich in nitrogen) and “browns” (materials that are rich in carbon). Each of the ingredients you add to your compost has a unique carbon to nitrogen ratio. For backyard piles, it is not necessary to precisely track and measure your carbon to nitrogen ratio (though you can if you are a chemistry or math enthusiast!). The important thing is to use about 3 times as many browns as greens by volume (about a 1:1 ratio by weight). It is best to err on the side of too many browns, since browns help relieve odors, deter pests, and keep the pile aerated.


Browns
Dried leaves
Straw & hay
Small sticks & twigs
Woodchips & sawdust (from untreated wood)
Dried grass & garden trimmings
Paper towels & napkins
Shredded newspaper, egg cartons, & unbleached cardboard
Greens
Fruit & veggie scraps (including pits & peels)
Grains (bread, pasta, rice, etc.)
Egg shells
Coffee grounds
Tea leaves
Fresh grass & garden trimmings
Livestock manure
What not to compost in your backyard
Keep the following materials out of backyard compost systems:
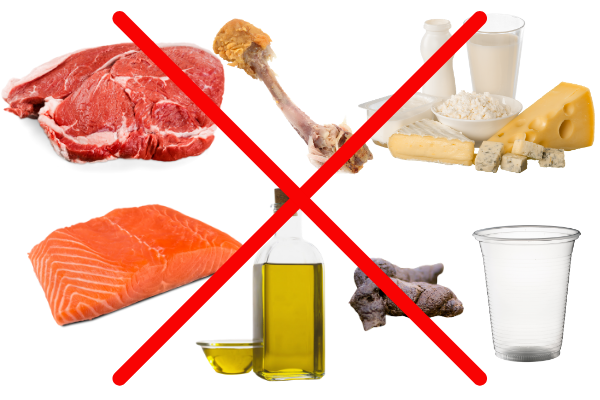
Meat & bones
Large amounts of dairy
Oil, grease, & fats
Dog or cat feces & litter
Glossy paper
Weed seeds
Diseased & invasive plants
Treated or painted wood
Pesticide-treated materials (including flowers from florists)
Anything synthetic (plastics; synthetic fabric scraps & dryer lint; plastic-coated cups, bowls, & plates; etc.)
Biodegradeable plastics (these usually require industrial systems and high temperatures to break down)

Step 4: Layer
Once you have the container set up and you know what ingredients you’ll be using, you’re ready to start building up the pile. Start with a layer of coarser browns (like criss-crossed sticks and twigs) at the bottom to encourage air flow throughout the pile. Then, alternate between layers of greens and browns. You don’t need to stockpile ingredients and build the entire pile all at once - you can build the pile over time, layer by layer. Each time you add a layer of greens make sure to top it off with a layer of browns. Food scraps should not be visible from outside the pile. This will keep away pests and reduce the odor of the pile.

Step 5: Turn the pile (or don’t)
Turning the pile helps the process go a little quicker and can help aerate the pile, but is not absolutely necessary. To turn the pile, you can either leave the pile where it is and stir with a pitchfork or aerator tool, or shovel the pile to an empty space next to it. If you have a bin, the easiest way to do this is to pull the bin off the pile if possible, set it down next to the pile, and shovel the pile into the empty bin.
While “under-turning” the pile is not usually a problem, it is possible to turn a pile too much. The composting process relies on living creatures to process the materials, and these creatures need time to establish “colonies” within the pile. If you turn a pile too much, these colonies get disturbed and the process becomes stalled. Do not turn your pile any more than once every two weeks. (And once every couple months - or even not at all - is fine too!) Over-turning is a common problem with tumbler-users, since tumblers are so easy to turn. If you are using a tumbler, remember this!
Step 6: Keep the PIle Moist
In addition to greens and browns, compost piles need three other things: moisture, oxygen, and time. If you are composting with food scraps, most of the moisture will come from these scraps. In fact, depending on the moisture of your scraps, you may not need to water your pile at all. Check the inside of the pile every once in a while to make sure it is about as moist as a wrung out sponge. If it is not moist enough, add more wet food scraps or give it a little water. If it is too moist, add more browns. Be careful not to over-water your pile - too much water means the pile is not getting enough oxygen!

Step 7: Harvest
Because backyard piles are small and do not typically get very hot, they are slower than larger, more strictly managed piles at industrial compost facilities. Backyard piles usually take 9-12 months (give or take, depending on how carefully the pile is managed) to produce usable compost. The compost is ready when you can no longer recognize the ingredients - it will look like dark, crumbly soil and have an earthy scent. Depending on how often you turned the pile, the bottom of the pile may be ready sooner than the top - you can harvest that first! Shovel out the usable compost and return the rest to the bin. It is now ready to use!
If you want a smoother, more consistent product, you can screen the finished compost with a mesh nursery tray or some hardware cloth on a wood frame. If you don’t mind it chunky, you can use it as is.
Click here to learn how to use your homemade compost!